Single Sign-On with Windows Domain Account (Trusted Http Header)
Purpose
This tutorial explains how to set up an environment so that Windows domain user can access QuickBuild without using password.
Assumptions
- Windows domain is example.com
- Windows domain controller server is Windows 2012 R2, and can be accessed via LDAP protocol: ldap://dc.example.com:389
- QuickBuild server is installed at Ubuntu 3.13.0-40-generic, with DNS name build.example.com, and running on port 8810
Steps
-
Login to ubuntu server, and make sure below commands work as expected: *
$ nslookup build.example.comThis command should return ip address of the ubuntu server *
$ nslookup <ip address of ubuntu server>This command should return build.example.com
- Make sure build.example.com is the only host record in your DNS pointing to the ubuntu server, and vice versa for the reverse lookup dns records (PTR). Otherwise, single sign-on may not work for some unknown reason.
-
Create a domain user quickbuild in your domain controller, with following options:
-
Create another domain user apache with same options as above
-
On domain controller, open powershell as Administrator, and run below command to generate keytab for apache user:
ktpass -princ HTTP/build.example.com@EXAMPLE.COM -mapuser apache -crypto RC4-HMAC-NT -ptype KRB5_NT_PRINCIPAL -pass <password of apache user> -out apache.keytabThe generated apache.keytab will be used later.
-
Login to ubuntu server to install and configure kerberos client package:
sudo apt-get install krb5-userInput EXAMPLE.COM when installation procedure asks for default Kerberos realm. After installing Kerberos, modify /etc/krb5.conf:
-
add below under section [realms] :
EXAMPLE.COM = {
                kdc = dc.example.com
                default_domain = example.com
} -
add below under section [domain_realm]
.example.com = EXAMPLE.COM
        example.com = EXAMPLE.COM
Now test if Kerberos client works by runnig command kinit _<your Windows domain logon name> . If configured correctly, it should prompt you to input your domain password to get the ticket. Then you should be able to list the ticket by running klist.
-
-
Continue to configure apache httpd server on the ubuntu server:
-
Install apache httpd server if it is not already installed:
sudo apt-get install apache2 -
Install apache kerberos module if it is not already installed:
sudo apt-get install libapache2-mod-auth-kerb -
Enable below apache modules:
$ sudo a2enmod proxy_http rewrite headers -
Copy file apache.keytab generated above from your domain controller to ubuntu server and place it under directory /etc/apache2 , and then run below commands against the file:
$ sudo chown www-data apache.keytab
$ sudo chgrp www-data apache.keytab
$ sudo chmod 600 apache.keytab
-
-
Create file /etc/apache/sites-available/build.example.com.conf with below content to define virtual host for QuickBuild:
<VirtualHost *:80>
        # if you are configuring reverse proxy with https enabled, make sure to prepend the ServerName
        # directive with "https://" schema, for example: https://build.example.com:443
        ServerName build.example.com

        ProxyRequests Off

        # turn off this option. We will rely on ProxyPassReverse to translate
        # urls in Http response headers.
        ProxyPreserveHost Off

        <Proxy *>
                Order allow,deny
                Allow from all
        </Proxy>

        ProxyPass / http://localhost:8810/
        ProxyPassReverse / http://localhost:8810/

        <Location />
                AuthType Kerberos
                AuthName "Build Server"
                KrbAuthRealms EXAMPLE.COM
                KrbServiceName HTTP
                Krb5Keytab /etc/apache2/apache.keytab
                KrbMethodNegotiate on

                # Turn on this option in case the browser does not support Kerberos authentication,
                # in that case, it will fall back to http basic authentication to prompt user for
                # password.
                KrbMethodK5Passwd on

                Require valid-user

                # Below directives puts logon name of authenticated user into http header _X-Forwarded-User_
                # so that QuickBuild can use it
                RequestHeader unset X-Forwarded-User
                RewriteEngine On
                RewriteCond %{LA-U:REMOTE_USER} (.+)
                RewriteRule .* - [E=RU:%1,NS]
                RequestHeader set X-Forwarded-User %{RU}e

                # Remove domain suffix to get the simple logon name
                RequestHeader edit X-Forwarded-User "@EXAMPLE.COM$" ""
        </Location>

        # Below directives turn off Kerberos authentication for various QuickBuild services as their clients
        # are not able to handle Kerberos authentication. QuickBuild will use the traditional http basic
        # authentication in this case.
        <LocationMatch "/(rest|service|agent_update|file_transfer|download|batch_download)">
                AuthType None
                Order allow,deny
                Allow from all

                RequestHeader unset X-Forwarded-User
        </LocationMatch>

        ErrorLog ${APACHE_LOG_DIR}/quickbuild-error.log
        CustomLog ${APACHE_LOG_DIR}/quickbuild-access.log combined
        LogLevel warn
</VirtualHost> -
Run below commands to enable virtual host created above and restart Apache:
$ a2ensite build.example.com.conf
$ sudo service apache2 restart -
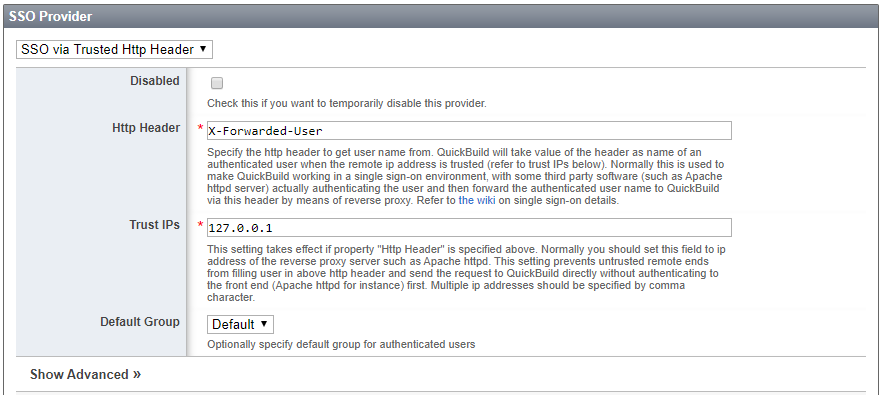
Login to QuickBuild as administrator, switch to page Administration/Security Settings , and specify SSO provider as SSO via Trusted Http Header with http header set to X-Forwarded-User passed from Apache reverse proxy like below:

Here we only trust this header if it originates from ip 127.0.0.1 as Apache is installed on the same server -
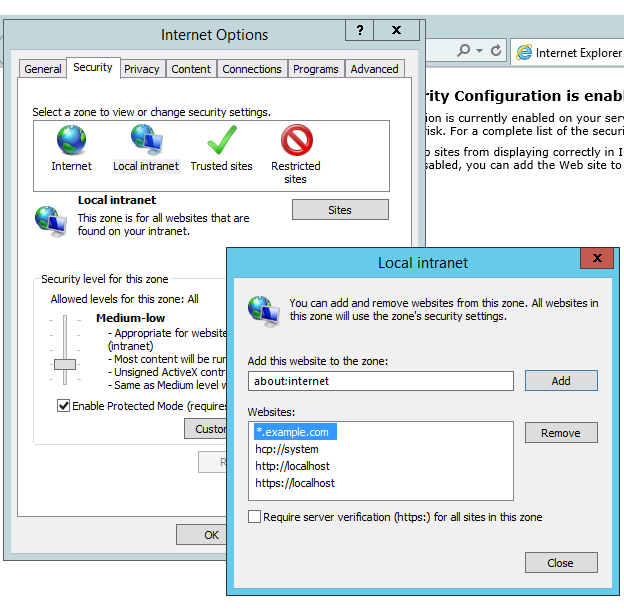
Now everything has been configured at server side, logon to a Windows workstation with your domain account and open your browser. Before visiting build.example.com , we still need to configure the browser to trust url example.com:
- on Internet Explorer, open Internet Options/Security /Local intranet to add .example.com :

- Chrome internet option is pretty much the same as Internet Explorer
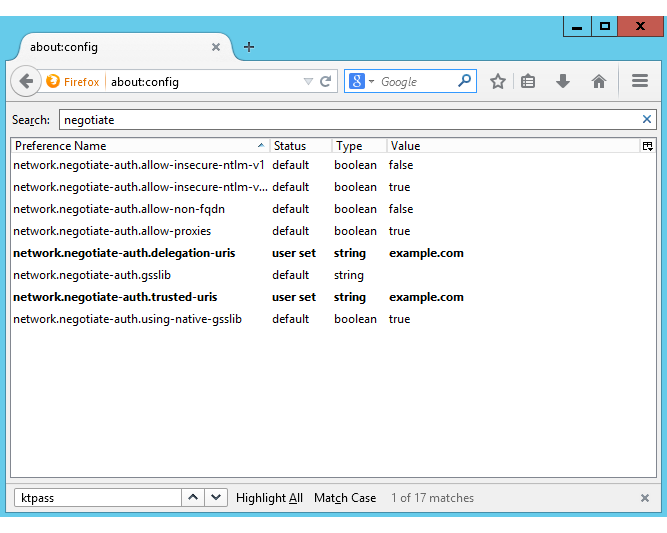
- on Firefox, input about:config on the address bar, and search for negotiate in the config. Then add example.com to config network.negotiate-auth.delegation-uris and network.negotiate-auth.trusted-uris like below:

- on Internet Explorer, open Internet Options/Security /Local intranet to add .example.com :
-
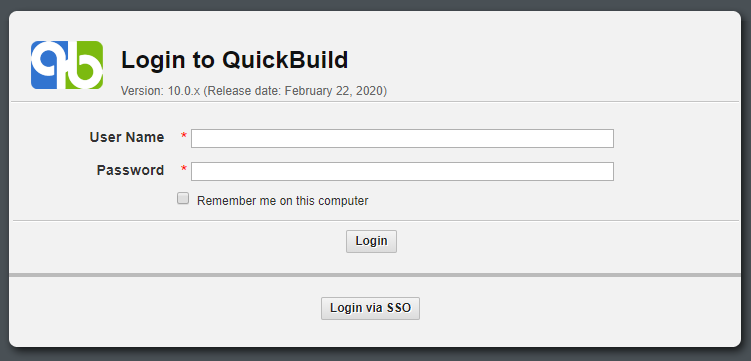
Now visit QuickBuild sign-in page, there should exist a SSO login button to let users login without username/password. Permission of users logged in this way will be determined by default group configured at SSO provider page.
 warning
You can still login to QuickBuild with normal user/password without clicking the SSO button