Since 4.0, you can add your own test report plugin by using report plugin APIs. Normally, an typical issue tracker plugin contributes below extension points:
- BuildTabContribution displays a tab in build page to show related issues
- BuildSummaryContribution displays a summary section to show how many issues are related in a build in build dropdown
- Gadget displays the related issues of a configuration in Dashboard page
- CommentTransformer hyperlink the issues occurred in commit comment by a pattern
- StatisticsSupport collects issues by build so that we can compare with a specified build
even more, contribute some steps to create/update issues.
You needn't write the plugin from ground up, plugin com.pmease.quickbuild.tracker.core implements and encapsulates most of them already, just follow below instructions to create an issue tracker plugin. If you are not familiar with how to set up your development environment or how to create and test a plugin, please read [plugin tutorials] and some plugin examples first. Or you may read the Redmine plugin source code directly. Below we will show you how to add a Redmine plugin.
Plugin Activator
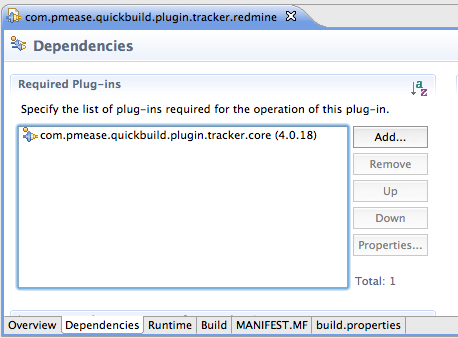
Every issue tracker plugin needs a plugin activator. As plugin com.pmease.quickbuild.tracker.core has already done a lot of things, add it to plugin dependencies in MANIFEST.MF, and actually, in most cases, you only need this dependency.
And then, implement the activator by extending AbstractTrackerPlugin:
public class RedminePlugin extends AbstractTrackerPlugin {
    public IssueTracker createTracker() {
        return new RedmineTracker();
    }

    protected IssueCategory createCategory() {
        return new RedmineCategory();
    }

    public Class<?> getConfigurationSettingClass() {
        return RedmineSetting.class;
    }
}
It is fairly simple, and we will discuss more detailed below.
IssueTracker
IssueTracker is an interface which tell QuickBuild how to fetch issue related information from remote server:
public interface IssueTracker extends CommentTransformer {
    /**
     * Return the total issues in a build
     */
    int getIssueCount(Build build);

    /**
     * Get the issue pattern which will be used to match issue key in commit message
     * @return
     */
    Pattern getIssuePattern();

    /**
     * Extract the issue key from a matched issue key, for example: extract bug:123 to 123, #456 to 456
     *
     * @param matched
     * @return
     */
    String extractIssueKey(String matched);

    /**
     * Batch fetching issues data from remote.
     *
     * @param keys need be fetched
     * @return a map of fetched issues data
     */
    Map<String, Issue> fetchIssues(Collection<String> keys);

    /**
     * Get the issue url pattern which will be used to hyperlink the issue key, for example, for JIRA issue,
     * the pattern would be: http://jira-server/browse/$KEY.
     * Note: always use <b>$KEY</b> as we will use it to replace with the actual issue key.
     *
     * The server url can be retrieved from the tracker setting. So, for JIRA, this function can be
     * simply implemented like below:
     * <code>
     * public String getIssueUrlPattern() {
     *     JiraSetting setting = JiraSetting.get(); // Retrieve JIRA setting of current configuration
     *     return StringHelper.normalizeUrl(setting.getHost()) + "/browse/$KEY";
     * }
     * </code>
     *
     * @return the pattern of issue url
     */
    String getIssueUrlPattern();
}
To implement IssueTracker, extend com.pmease.quickbuild.plugin.tracker.core.AbstractIssueTracker which implements most of the functions above:
public class RedmineTracker extends AbstractIssueTracker {

    public Map<String, Issue> fetchIssues(Collection<String> keys) {
        ... ...
    }

    public String getIssueUrlPattern() {
        RedmineSetting setting = RedmineSetting.get();
        return StringHelper.normalizeUrl(setting.getHost()) + "/issues/$KEY";
    }

    @Override
    public String extractIssueKey(final String matched) {
        Long id = TrackerHelper.extractLong(matched);
        if (id == null) {
            return null;
        } else {
            return id.toString();
        }
    }

}
fetchIssues() is tracker related, you need implement according to your issue tracker API.
Class Issue includes below properties:
public class Issue implements Serializable {

    private String issueKey;
    private String issueType;
    private String summary;
    private String status;
    private String priority;
    private String resolution;
    private Calendar created;
    private Calendar updated;
    private String assignee;
    private String reporter;
}
IssueCategory
All issues report will be saved to your configuration or build reports directory. The IssueCategory encapsulates the issue related operations, like save/load from H2 database, displays to user, etc. So implement your IssueCategory like below:
public class RedmineCategory extends IssueCategory {
    // return the name of the category
    public String getName() {
        return "Redmine";
    }

    // return the unique id of category
    public String getId() {
        return "redmine";
    }

    // return the order which you want to display in QuickBuild
    public int getOrder() {
        return 150;
    }
}
Configuration Setting
You need add a configuration setting class let user define the issue tracker server:
@Editable(name = "Redmine Server", order=1000, category="Issue Tracker")
public class RedmineSetting extends AbstractTrackerSetting {
    public RedmineSetting() {
        // default issue pattern
        issuePattern = "(?<!\\:)(?:#|bug:)\\d+";
    }
}
AbstractTrackerSetting defines below properties:
public abstract class AbstractTrackerSetting implements TrackerSetting {
   String host;
   String user;
   String password;
   String issuePattern;
}
Just add as more fields as you need to the setting class, and apply some annotations to your getter method, QuickBuild will display the form without writing one line for GUI. See this page for details. For example, we add associate project to RedmineSetting:
public class RedmineSetting extends AbstractTrackerSetting {
    private String associatedProject;

    ... ...

    @Editable(name = "Associated Project", order = 500)
    @NotEmpty
    @Scriptable
    public String getAssociatedProject() {
        return associatedProject;
    }
}
Now, in Redmine setting, a new field Associated Project is added which is a required field and also user can use script to provide this property.
Finally, package the plugin and copy to QuickBuild server plugins directory, restart QuickBuild. To test your plugin, here is Redmine, you need:
- configure the Redmine Server in configuration settings
- add a repository to the configuration
- add a checkout step
- trigger a build
- submit some modifications to your repository, in the commit message, add some issues you want
- trigger a build again
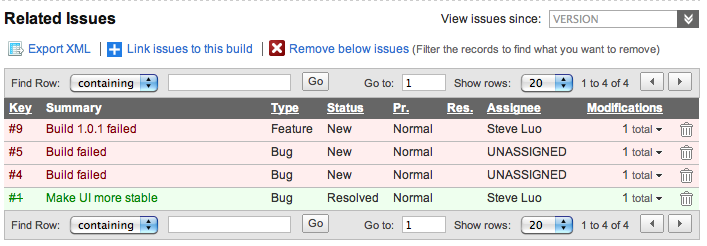
If you are lucky, you can find all issues mentioned in commit messages are hyperlinked and a tab named Redmine which displays all issues mentioned in commit messages is added in build page.
Exposing Issues Report
You can also expose your issues report via REST:
@Path("/redmine")
public class RedmineRestResource extends TrackerResource {
}
and then add this class to the plugin activator so QuickBuild can know you want to expose it:
public class RedminePlugin extends AbstractTrackerPlugin {
    ... ...
    protected Class<?>[] getRestResourceClasses() {
        return new Class[] { RedmineRestResource.class };
    }
And now you can visit below URL to access your issues report:
http://your-quickbuild/rest/redmine
See Interact with Issues for all RESTful functions.
Contributing to Dashboard
If you want to display your issues report to Dashboard, you can create a Gadget class:
@Editable(name = "Redmine Issues", category = GadgetCategory.CHANGES_AND_ISSUES)
public class RedmineGadget extends AbstractIssueGadget {
}
and then add to your plugin activator like:
public class RedminePlugin extends AbstractTrackerPlugin {
    ... ...

    protected Class<? extends Gadget>[] getGadgetClasses() {
        return new Class[] { RedmineGadget.class };
    }
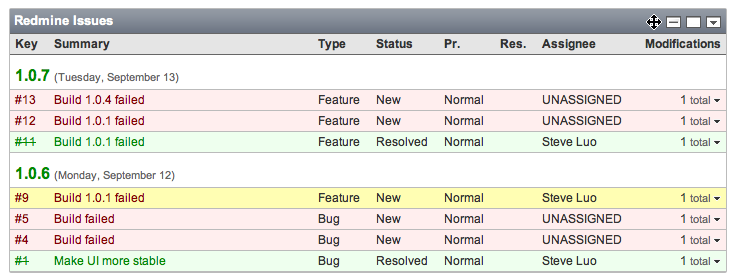
Now, in Dashboard page, you can find a gadget named Redmine Issues is available. When add it to your dashboard, you may see the gadget like below:
Create/Update Issue
If you want to create/update issues, you can add some step class to do this, and add them to your plugin activator like below:
public class RedminePlugin extends AbstractTrackerPlugin {

    ... ...

    protected Object[] getExtraExtensions() {
        return new Object[] {
                new StepProvider() {
                    public Class<? extends Step> getStepClass() {
                          return CreateIssueStep.class;
                    }
                },

                new StepProvider() {
                    public Class<? extends Step> getStepClass() {
                          return UpdateIssueStep.class;
                    }
                }
        };
    }
}