<< View previous version | view page history | view next version >>
From QuickBuild 3, a two-way solution is provided to integrate with Atlassian JIRA.
On This Page
Integrate JIRA in QuickBuild
The integration features:
- Hyperlink the JIRA keys in commit messages to corresponding JIRA pages
- Generate an issues report from commit messages
- Progress/update the issues from commit messages
- Release a version of a project in JIRA and update the fixed versions field of issues with status fixed or closed
- Create an issue to JIRA based on a customized step condition
Simple Integration
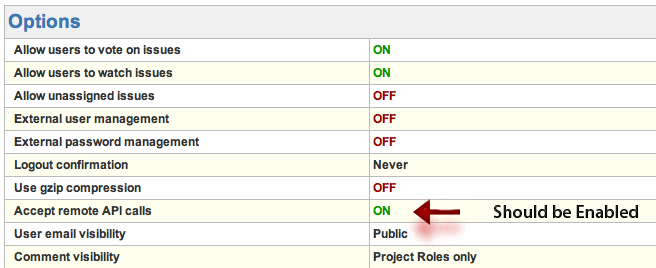
To enable the integration:
1. Enable 'Access remote API calls' in JIRA
2. Configure JIRA server in your configuration setting tab
Unable to render embedded object: File (jira-server-settings.png) not found.
You can associate multiple JIRA projects with one QuickBuild configuration.
After doing these, the issues keys mentioned in commit messages will be hyperlinked:

and an issues report tab will be displayed in Build tab:
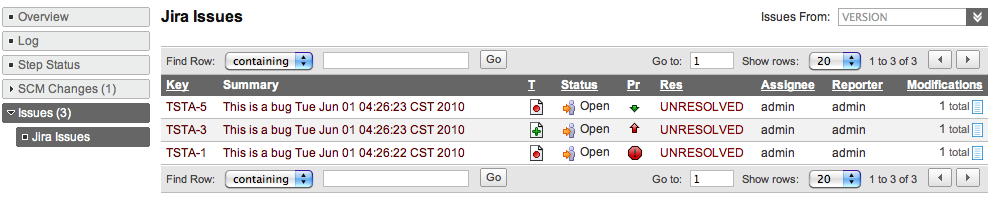
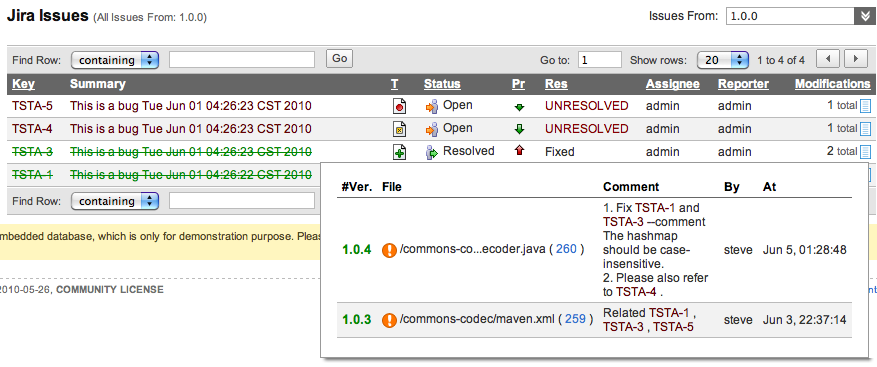
also, you can find all related issues from a specified version and view the changes for an issue:
After configured the JIRA server in the configuration setting, below steps are available to add in your build workflow:
- Update Issue Step
- Release Version Step
- Create Issue Step

Update Issues Via Commit Command
To update issues from the commit messages, Update JIRA Issue step should be added to your build workflow.
NOTE:
- To update issues, the user defined in JIRA server should has the proper rights or you will be not able to update the issues.
- This step should be defined after your checkout step.
- QuickBuild will update all issues which are requested from the commit comments from previous successful build.
- If issue updated manually after committed, this issue will not be updated then.
- Only issues which belong to the projects defined in JIRA server will be updated.
Commit Command
A commit command in commit message defines what kind of action will be executed to update an issue. The commit command has below syntax:
COMMAND_NAME ISSUE_KEY [--ATTRIBUTE1 VALUE1] [--ATTRIBUTE2 VALUE2]
For example, the command below will progress the issues TST-1, TST-2 and TST-3 with workflow transition 'Resolve Issue' and add comment 'something is updated' to them.
Fix TST-1, TST-2 and TST-3 --comment something is updated
The commit command is case-insensitive, that means Fix TST-1 is equals to fix TST-1 or FIX TST-1.
Normally, one command is in one line, if you need multiple line for an attribute, a '\' should be added to the end of line, for example:
Fix TST-1 --comment First line comment \
Second line comment \
Third line comment
Command Name
The commit command has two types:
- Progress Command which is used to progress an issue in the JIRA workflow
- Update Command which is used to update an issue only and will not lead to a workflow transition and use update as the command name.
The progress commands can be customized in the Update Jira Issue step based on your JIRA workflow definition.

Command Attributes
A commit command has below attributes, each attribute relates to the field of an issue:
| Attribute | Description |
|---|---|
| summary | The summary of an issue |
| description | The description of an issue |
| type | The issue type |
| priority | The issue priority |
| reporter | The reporter of an issue |
| assignee | The assignee of an issue |
| environment | The environment field of an issue |
| affectsVersions | The affects versions field of an issue |
| fixVersions | The fixed versions field of an issue |
| comment | Add a comment to an issue |
| time | Records the time tracking information of an issue |
The attributes also support custom fields, for custom fields, below format are supported:
customfield_10000
or just
10000
here, 10000 is the field id of a custom field.
Below we will give some example commit messages to illustrate the commit commands:
1. Modified Foo.java to fix TST-1, TST-2 --comment The issue has been fixed
2. Some dummy comments ...
In this commit message, QuickBuild will resolve the issues TST-1 and TST-2 and add comment The issue has been fixed to both issues.
Update TST-1 --time 2d 3h --comment Some comment
In this commit message, QuickBuild will add 2d 3h to the worklog and add comment Some comment to issue TST-1. The value of time 2d 3h should be used the format defined in JIRA time tracking.
Please note, to use time attribute time tracking must be enabled in your JIRA server. Please check with your JIRA Studio administrator, if you cannot record time tracking information against issues. |
Update TST-1 --customfield_10000 for custom field1 --10001 for custom field2
In this commit message, the value of custom field 10000 will be updated to for custom field1 and custom field 10001 will be updated to for custom field2.
With the definition above, you can now update an issue in your commit message by writing commands like:
1. Fix TSTA-1, TSTA-2 and TSTA-3
2. Close TSTA-4
The commands above will progress the issues TSTA-1, TSTA-2 and TSTA-3 with 'Resolve Issue' workflow and progress the issue TSTA-4 with 'Close Issue' workflow.
NOTE
- A commit command should be in one line.
QuickBuild Side
Jira Side
Unable to render embedded object: File (jira-issue-changes.png) not found.
Unable to render embedded object: File (jira-issue-builds.png) not found.
Unable to render embedded object: File (jira-project-builds.png) not found.
FAQ
- Q: I can't add comment to a closed issue, why?
A: You need modify the file $JIRA_HOME/atlassian-jira/WEB-INF/classes/jira-workflow.xml, find 'Closed' step and change the value of 'jira.issue.editable' to true.
- Q: The commit command failed with error: Workflow step 'Start Progress' is not valid for issue: XXX-123, but I can progress the issue in Jira GUI.
A: The user defined in QuickBuild Jira setting should have the permissions to do all of the workflow actions which defined in workflow command transition. If you encountered the problems above, please login to Jira with that user and check the 'Available Workflow Actions' section.