<< View previous version | view page history | view next version >>
To add JUnit![]() report, only need two steps:
report, only need two steps:
- Generate JUnit XML report from Ant
 or Maven or any other build tools.
 - Publish JUnit report in the [configuration].
Generate JUnit Report
QuickBuild will NOT generate JUnit![]() report automatically, so first make sure the JUnit
report automatically, so first make sure the JUnit![]() report is produced by ANT
report is produced by ANT![]() or by any other build tools, the following example shows how to generate JUnit test results by Ant JUnit task
or by any other build tools, the following example shows how to generate JUnit test results by Ant JUnit task![]() :
:
<target name="junit">
    <junit printsummary="yes" haltonfailure="yes">
        <classpath>
 	    <pathelement location="${build.tests}"/>
            <pathelement path="${java.class.path}"/>
 	</classpath>

        <formatter type="xml"/> <!-- DO use xml here -->

 	<batchtest fork="yes" todir="reports/junit">
            <fileset dir="${src.tests}">
                <include name="**/*Test*.java"/>
                <exclude name="**/AllTests.java"/>
            </fileset>
        </batchtest>
    </junit>
</target>
The code snippet will generate the XML reports for each test case, and the reports will be captured to 'reports/junit' directory. You may also want to merge all the test case report by using Ant JUnitReport task![]() like:
like:
<target name="junit">
    <junit>
       ... ...
    </junit>

    <junitreport todir="${outputdir}">
        <fileset dir="reports/junit">
            <include name="TEST-*.xml"/>
        </fileset>
        <report todir="${outputdir}/html"
                styledir="junitreport"
            format="frames">
            <param name="key1" expression="value1"/>
            <param name="key2" expression="value2"/>
        </report>
    </junitreport>
</target>
After adding generate the XML report(s) for your test results, you can tell QuickBuild to add those results now.
Publish JUnit Report
Just like all other build reports, to add JUnit report is by [adding a publish step] in a [configuration]. When you add publish JUnit Report step, the following screen will be displayed:
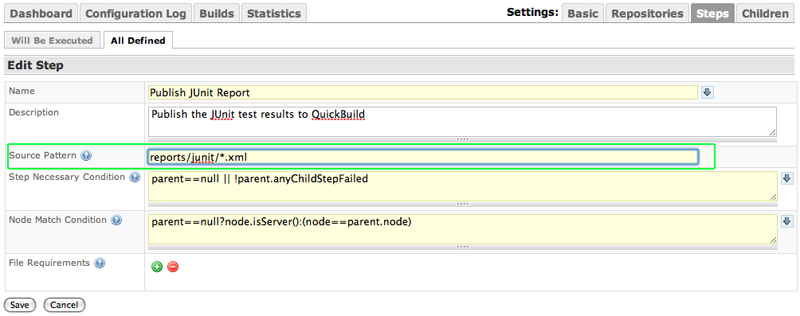
In source files field, QuickBuild use Ant style file patterns to collect the reports, and the directory you specified is relative to the [workspace] directory.
More on JUnit Report
|