<< View previous version | view page history | view next version >>
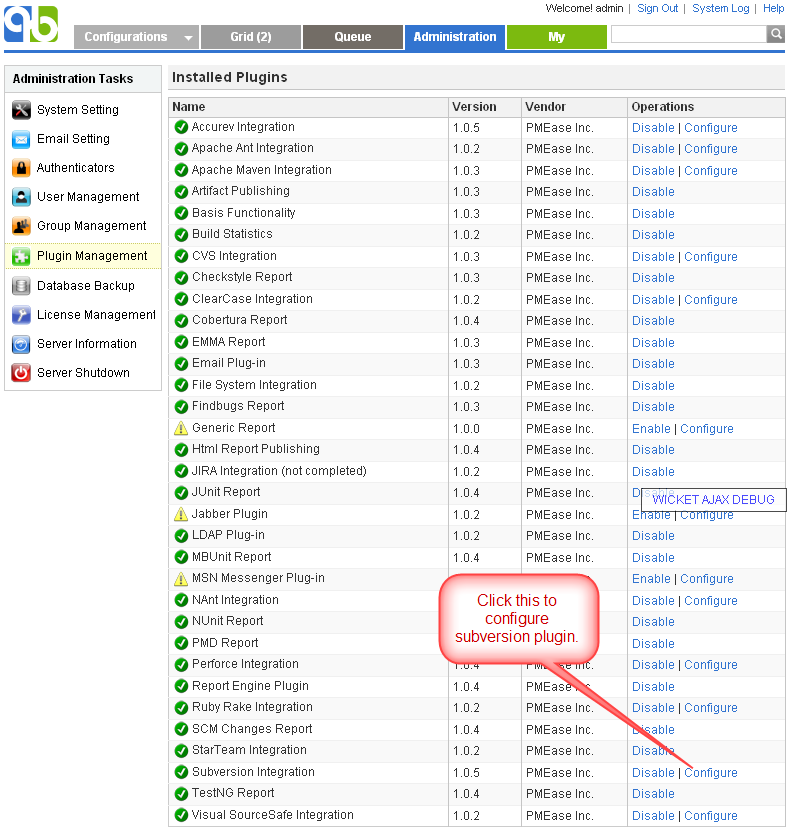
Specify svn command location
QuickBuild utilizes the svn command to interact with Subversion. If this command is not in system path, you will need to specify location of the command by configuring Subversion plugin as below:
Further more, svn command location can be specified on a per-node basis by following below steps:
- Open Subversion plugin setting page and define the svn path property as:
${node.getAttribute("svnPath")} - For each node that does not have svn command on system path, define the user attribute svnPath to point to the actual svn command location like below:
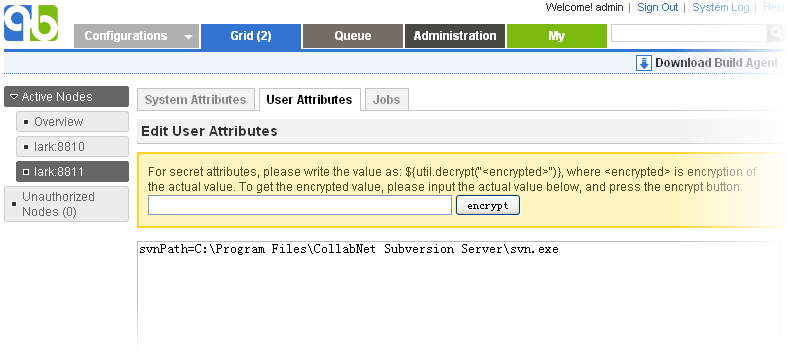
For user agent node, this user attribute can be defined follow this guide.
Please note that in above example, the svnPath user attribute is just for demonstration purpose. You can use any other user attribute name.
Handling https and svn+ssh schema
To connect to Subversion repository with https and svn+ssh schema, you'll need to permanently accept the Subversion server's certificate from the command line before running QuickBuild. The detailed step is:
- Login to the build machine as the user that will be used to launch QuickBuild process.
- Connect to your Subversion repository using Subversion command line, and if the server asks for whether or not to save credentials for subsequent usage, choose "yes".
- Make sure that subsequent Subversion command does not prompt for username and password.
- Start QuickBuild process.
Checkout from multiple urls
QuickBuild 2.0 removes module definition for Subversion repository to keep simple things simple, complex things possible. In most cases, checking out from a single url is sufficient. However, checking out from multiple urls is still possible, you just need to define multiple Subversion repositories pointing to desired url and to add corresponding checkout steps to check them out.
Things get a bit complex if these urls are pointing to the same Subversion SCM repository, and you want to make sure that these checkouts are performed against the same repository revision. To do this:
- Define a top level Subversion repository covering all urls you want to checkout. Let's assume the name of repository is top, the destination path property of this repository is not important as it will not be used for actual checkout.
- Define the property snapshot taking script (can be found in advanced settings of a configuration) as below:
var topRepos = repositories.get("top");
topRepos.takeSnapshot();
repositories.get("repository1").setRevision(topRepos.getRevision());
repositories.get("repository2").setRevision(topRepos.getRevision());
Here repository1 and repository2 represents the repositories responsible for checking out codes.
External support
If ignore externals option is not checked, QuickBuild will checkout specified url together with any external definitions. Upon checkout, QuickBuild will also retrieve changes in externals to display them together with changes made in main repository like below:
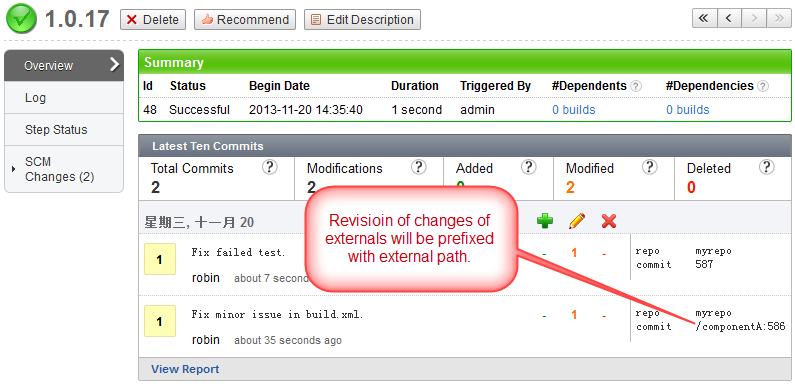
In this screenshot, changes retrieved from externals will have the commit prefixed with external path. You may view/diff source files in external change sets just as you do in normal change sets.
Proof build support
For general concept of proof build, refer to proof build. Here we explain how to set up Subversion repository to support proof build.
Test proof build as administrator
Since proof build set up is a bit tricky, we first set up proof build for the administrator account and make sure it works before we proceed to enable it for all developers. To set up proof build for administrator, please follow below steps:
- Login as administrator and download user agent by switching to My tab.
- Install and start user agent on your own desktop. For testing purpose, please start the agent as a foreground process. On windows, this can be done by running agent.bat; on Unix platforms, this can be done by running agent.sh console
- Set up a test configuration on QuickBuild server, define a Subversion repository, and enable the proof build option in advanced section like below:

- Make sure the svn command exist in the system path of both server machine and your desktop. If not, please follow the section Specify svn command location to tell QuickBuild location of svn command.
- Add a repository/checkout step into step execution graph and have it checkout from the repository defined above.
Now proof build has been enabled for your account, please try to checkout and edit some files in working copies specified above, and then run the test configuration. If set up correctly, your local change will be picked up and reflected in the build result. A local change tab will also appear to display your uncommitted changes after build finishes. Your uncommitted changes will be committed automatically if build is successful.
Enable proof build for all developers
Now that we have a concept of how proof build works. In order to get proof build works for all developers, we need to parameterize various proof build properties, so that different properties can be used for different developers. To do this, you will need to:
- Define configuration variables like below:
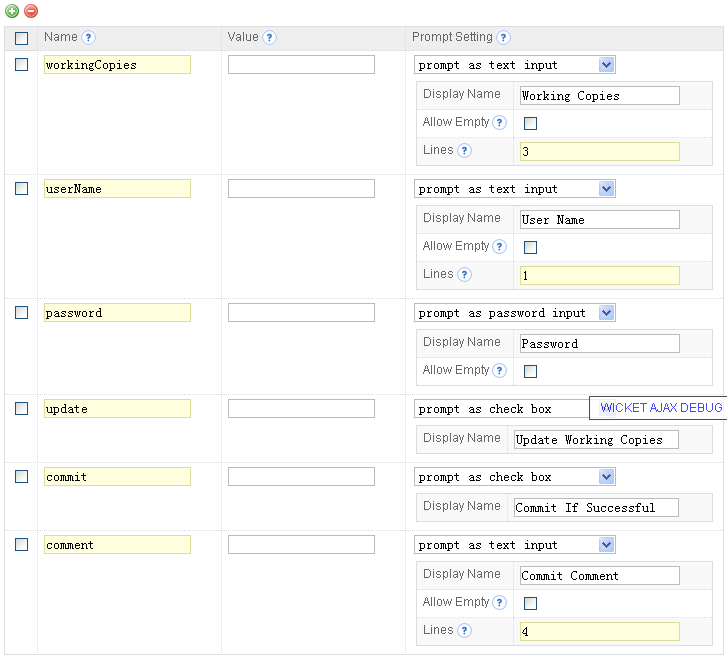
- Script various properties in proof build section to make use of above variables like below:
Property Name Property Value Working Copies ${vars.get("workingCopies")} User Name ${vars.get("userName")} Password ${vars.get("password")} Update Condition vars.get("update").asBoolean() Commit Condition build.successful && vars.get("commit").asBoolean() Commit Comment ${vars.get("comment")}
In this way, various proof build properties will be prompted when your developer run the build. Once they've been input by your developer for the first time, the values will be remembered for subsequent triggers for that user.
At last we suggest to set up the configuration to enable concurrent builds so that multiple builds in the same configuration can run concurrently. This is vital to get fast feedback in case multiple developers are requesting proof builds in the same time.