<< View previous version | view page history | view next version >>
Define subversion repository
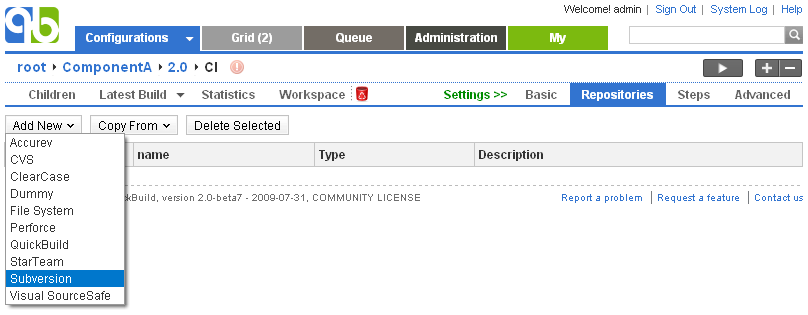
Subversion repository can be defined by choosing the subversion menu item from the repository menu as follows:

If you cannot find the Subversion menu item, it probably means that Subversion plugin has been disabled on plugin management page.
Specify cleartool command location
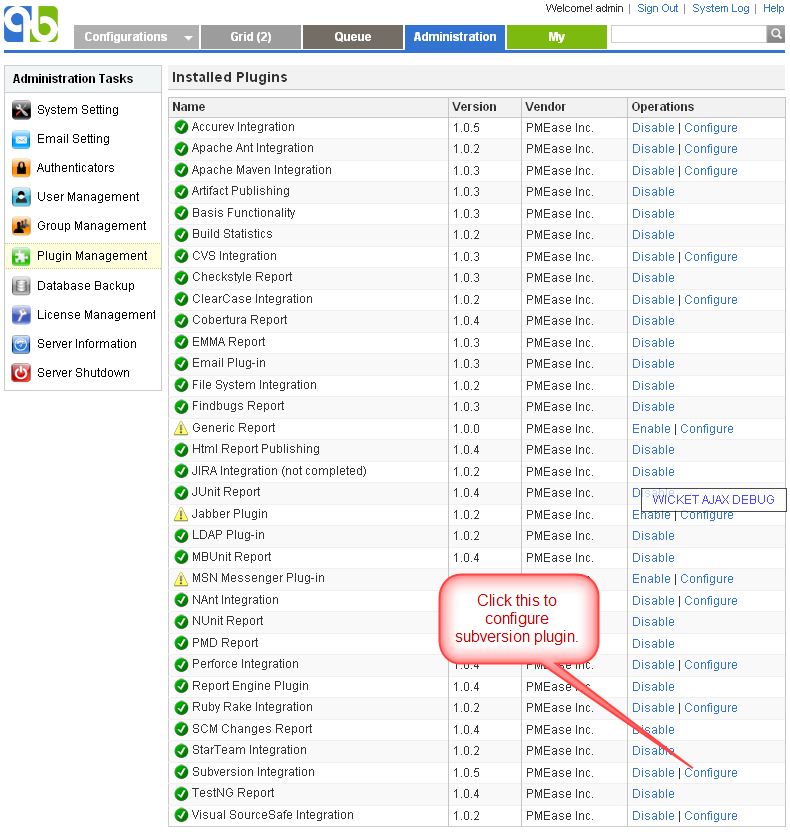
QuickBuild utilizes the svn command to interact with Subversion. If this command is not in system path, you will need to specify location of the command by configuring Subversion plugin as below:

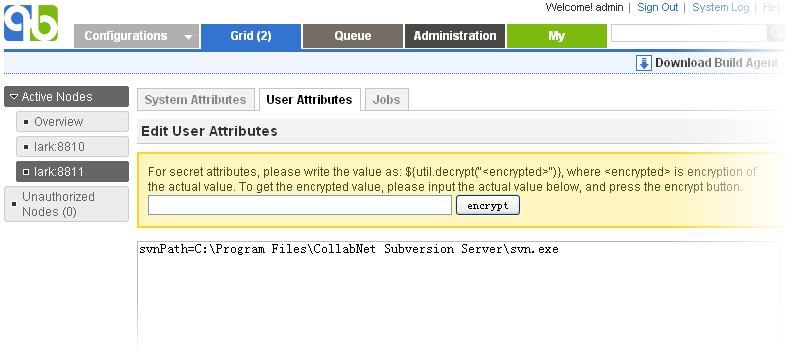
Further more, svn command location can be specified on a per-node basis by following below steps:
- Define the svn path property as:
${node.getAttribute("svnPath")} - For each node that does not have svn command on system path, define the user attribute svnPath to point to the actual svn command location like below:

Please note that in above example, the svnPath user attribute is just for demonstration purpose. You can use any other user attribute name.
Handling https and svn+ssh schema
To connect to Subversion repository with https and svn+ssh schema, you'll need to permanently accept the Subversion server's certificate from the command line before running QuickBuild. The detailed step is:
- Login to the build machine as the user that will be used to launch QuickBuild process.
- Connect to your Subversion repository using Subversion command line, and if the server asks for whether or not to save credentials for subsequent usage, choose "yes".
- Make sure that subsequent Subversion command does not prompt for username and password.
- Start QuickBuild process.
Checkout from multiple urls
QuickBuild 2.0 removes module definition for Subversion repository to keep simple things simple, complex things possible. In most cases, checking out from a single url is sufficient. However, checking out from multiple urls is still possible, you just need to define multiple Subversion repositories pointing to desired url and to add corresponding checkout steps to check them out.
Things get a bit complex if these urls are pointing to the same Subversion SCM repository, and you want to make sure that these checkouts are performed against the same repository revision. To do this:
- Define a top level Subversion repository covering all urls you want to checkout. Let's assume the name of repository is top, the destination path property of this repository is not important as it will not be used for actual checkout.
- Define the property snapshot taking script (can be found in advanced settings of a configuration) as below:
var topRepos = repositories.get("top");
topRepos.takeSnapshot();
repositories.get("repository1").setRevision(topRepos.getRevision());
repositories.get("repository2").setRevision(topRepos.getRevision());
Here repository1 and repository2 represents the repositories responsible for checking out codes.
External support
If ignore externals option is not checked, QuickBuild will checkout specified url together with any external definitions. However, it does not detect changes for external urls, that is, the isChanged() method for the repository does not return true even if there are new checkins made into the externals. There are two approaches to get around this:
- If you only want to detect changes from externals, and trigger the build if externals are changed.
- Keep ignore externals unchecked for the subversion repository.
- For each external url, define a corresponding Subversion repository in QuickBuild, the destination path property is not important as these repositories will only be used for changing detection. No checkout will be done for these repositories.
- Modify the build necessary condition to detect changes from these repositories. For example, if the main Subversion repository is defined as repository1, and it has two externals, defined as external1 and external2, the build condition can be defined as:
repositories.get("repository1").isChanged() || repositories.get("external1").isChanged() || repositories.get("external2").isChanged()
This approach has a limitation: although it can detect changes from externals and trigger the build, the external changeset does not appear in the build changes tab. The next approach addresses this.
- If you want to detect changes from externals, and trigger the build if externals has changed. Besides this, you also want changeset of externals appear in the build changes tab together with the main repository
- Check the option ignore externals of the main Subversion repository. That is, the main Subversion repository will no longer be responsible for external checkouts.
- For each external url, define a corresponding Subversion repository, and add steps to checkout these repositories together with the main repository. The destination path property for these external repositories should be well defined, so that the final checkout directory structure looks the same as the directory structure when externals are enabled to checkout.
- Modify the build necessary condition to detect changes from these repositories. For example, if the main Subversion repository is defined as repository1, and it has two externals, defined as external1 and external2, the build necessary condition can be defined as:
repositories.get("repository1").isChanged() || repositories.get("external1").isChanged() || repositories.get("external2").isChanged()
Proof build support
For general concept of proof build, refer to proof build. Here we explain how to set up Subversion repository to support proof build.
Test proof build as administrator
Since proof build set up is a bit tricky, we first set up proof build for the administrator account and make sure it works before we proceed to enable it for all developers. To set up proof build for administrator, please follow below steps:
- Login as administrator and download user agent by switching to My tab.
- Install and start user agent on your own desktop. For testing purpose, please start the agent as a foreground process. On windows, this can be done by running agent.bat; on Unix platforms, this can be done by running agent.sh console
- Set up a test configuration on QuickBuild server, and define a ClearCase repository and enable the proof build option like below:
Unable to render embedded object: File (clearcase4.png) not found. - Make sure the cleartool command exist in the system path of both server machine and your desktop. If not, please follow the section Specify cleartool command location to tell QuickBuild location of cleartool command.
- Add a repository/checkout step into step execution graph and have it checkout from the repository defined above.
Now proof build has been enabled for your account, please try to checkout and edit some file inside the local view path specified above, and then run the test configuration. If set up correctly, your local change will be picked up and reflected in the build result. A local change tab will also appear to display your uncommitted changes after build finishes. Your uncommitted changes will be committed automatically if build is successful.
Enable proof build for all developers
Now that we have a concept of how proof build works. In order to get proof build works for all developers, we need to parameterize the local view path property when define proof build support section of the repository, so that different view path can be used for different developers. There are two approaches for this:
- Define a configuration variable representing the local view path and have it prompt for a value when the configuration is manually triggered. For example, we may define a variable localViewPath as bleow:
Unable to render embedded object: File (variable1.png) not found.
And then we can script the local view path property in proof build section to take value of the variable localViewPath as below:${vars.get("localViewPath")}In this way, the local view path will prompted when your developer run the build. Once it has been input by your developer for the first time, the value will be remembered for subsequent triggers for that user.
- The second approach is to define local view path as user attribute in user agent nodes, and script the local view path property to take value of that attribute. For example, you tell your developers to define the user attribute localViewPath through their user agents, and reference the attribute by writing the local view path property as:
${node.getAttribute("localViewPath")}
Running user agent is a privileged action in QuickBuild. To give this permission to your developers, please follow below steps:
- Create a group for all your developers (or make use of an existing group if you already have) and authorize the user agent permission like below:
Unable to render embedded object: File (useragent1.png) not found. - Tell your developers to login to QuickBuild using their own accounts to download and install user agent. User agent will authenticate to the server using credentials of the user who downloaded the package. If user has changed the credentials later on, please run the command config.bat (or config.sh on Unix) under user agent's bin directory to set correct user name/password.