view page history | view next version >>
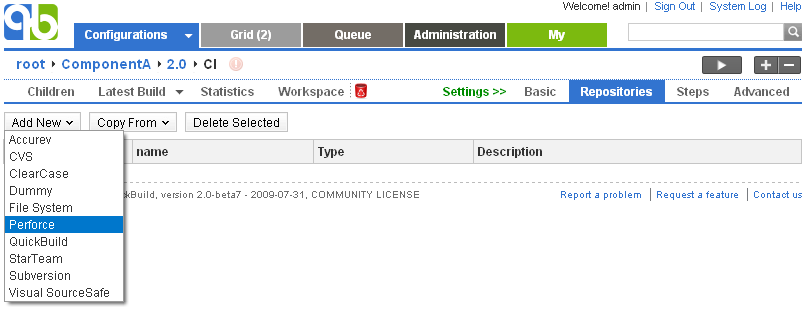
Define Perforce repository
Perforce repository can be defined by choosing the Perforce menu item from the repository menu as follows:
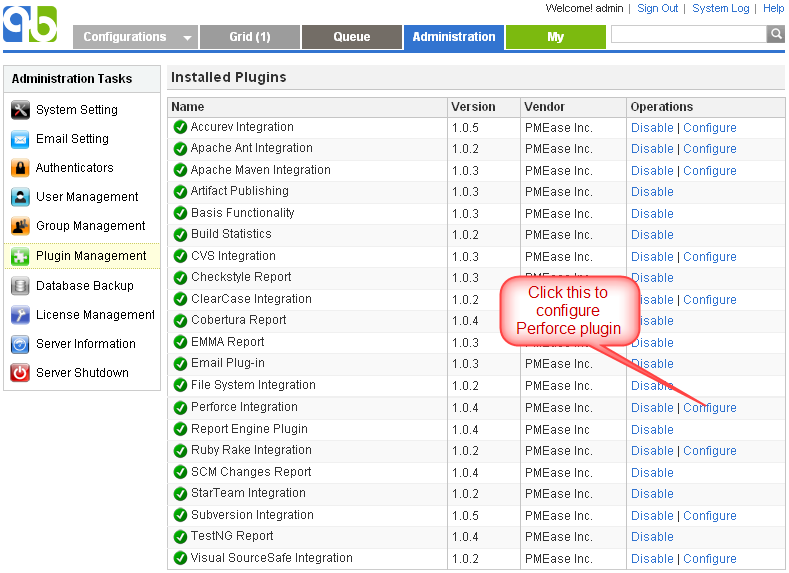
Specify p4 command location
QuickBuild utilizes the p4 command to interact with Perforce depot. If this command is not in system path, you will need to specify location of the command by configuring Perfoce plugin as below:
Further more, p4 location can be specified on a per-node basis by following below steps:
- Define the p4 path property as:
${node.getAttribute("p4Path")} - For each node that does not have p4 command on system path, define the user attribute p4Path to point to the actual p4 command path like below:
Unable to render embedded object: File (p4-path.png) not found.
Please note that in above example, the p4Path user attribute is just for demonstration purpose. You can use any other user attribute name.
Proof build support
For general concept of proof build, refer to proof build. Here we explain how to set up ClearCase repository to support proof build.
Test proof build as administrator
Since proof build set up is a bit tricky, we first set up proof build for the administrator account and make sure it works before we proceed to enable it for all developers. To set up proof build for administrator, please follow below steps:
- Login as administrator and download user agent by switching to My tab.
- Install and start user agent on your own desktop. For testing purpose, please start the agent as a foreground process. On windows, this can be done by running agent.bat; on Unix platforms, this can be done by running agent.sh console
- Set up a test configuration on QuickBuild server, and define a ClearCase repository and enable the proof build option like below:
Unable to render embedded object: File (clearcase4.png) not found. - Make sure the cleartool command exist in the system path of both server machine and your desktop. If not, please follow the section Specify cleartool command location to tell QuickBuild location of cleartool command.
- Add a repository/checkout step into step execution graph and have it checkout from the repository defined above.
Now proof build has been enabled for your account, please try to checkout and edit some file inside the local view path specified above, and then run the test configuration. If set up correctly, your local change will be picked up and reflected in the build result. A local change tab will also appear to display your uncommitted changes after build finishes. Your uncommitted changes will be committed automatically if build is successful.
Enable proof build for all developers
Now that we have a concept of how proof build works. In order to get proof build works for all developers, we need to parameterize the local view path property when define proof build support section of the repository, so that different view path can be used for different developers. There are two approaches for this:
- Define a configuration variable representing the local view path and have it prompt for a value when the configuration is manually triggered. For example, we may define a variable localViewPath as bleow:
Unable to render embedded object: File (variable1.png) not found.
And then we can script the local view path property in proof build section to take value of the variable localViewPath as below:${vars.get("localViewPath")}In this way, the local view path will prompted when your developer run the build. Once it has been input by your developer for the first time, the value will be remembered for subsequent triggers for that user.
- The second approach is to define local view path as user attribute in user agent nodes, and script the local view path property to take value of that attribute. For example, you tell your developers to install user agent and define the user attribute localViewPath through their user agents, and reference the attribute by writing the local view path property as:
${node.getAttribute("localViewPath")}